FluentEmail is an awesome library for simplifying sending email from your .NET applications. It offers a powerful yet simple fluent API, with Razor templating and support for a number of popular senders, including plain old SMTP, SendGrid, Mailkit and, as of Recently, Exchange Online.
It was possible to do this before using the SMTP sender, but it’s better to use the Microsoft Graph API (the FluentEmail Graph Sender is just an abstraction of this). Using the Graph API provides a number of advantages, including:
- It sends requests using REST, so you don’t need to worry about spam filters or blocking port 25 (for SMTP) on your network.
- It offers integration with Exchange features, such as calendar, voting buttons, and @ mentions (Note some features are experimental).
- You authenticate with an API key managed as an Azure AD app registration, so no need to create a service mailbox account and store/rotate login credentials.
You can check out the link above to learn more about FluentEmail in general, but in this post I’m going to show you how to send an email with FluentEmail via Exchange Online. There are two stages to this process - registering the app in Azure AD and adding FluentEmail to your application.
1. App Registration
The first thing you need to do is create an app registration in Azure AD. This registration will be assigned the permissions needed for sending mail, and will be used to generate the secret that you will call in your application. Follow the steps below to get this set up.
- Log in to the Azure portal with an account that has admin privileges on the Azure AD tenant that backs your Office 365 tenant.
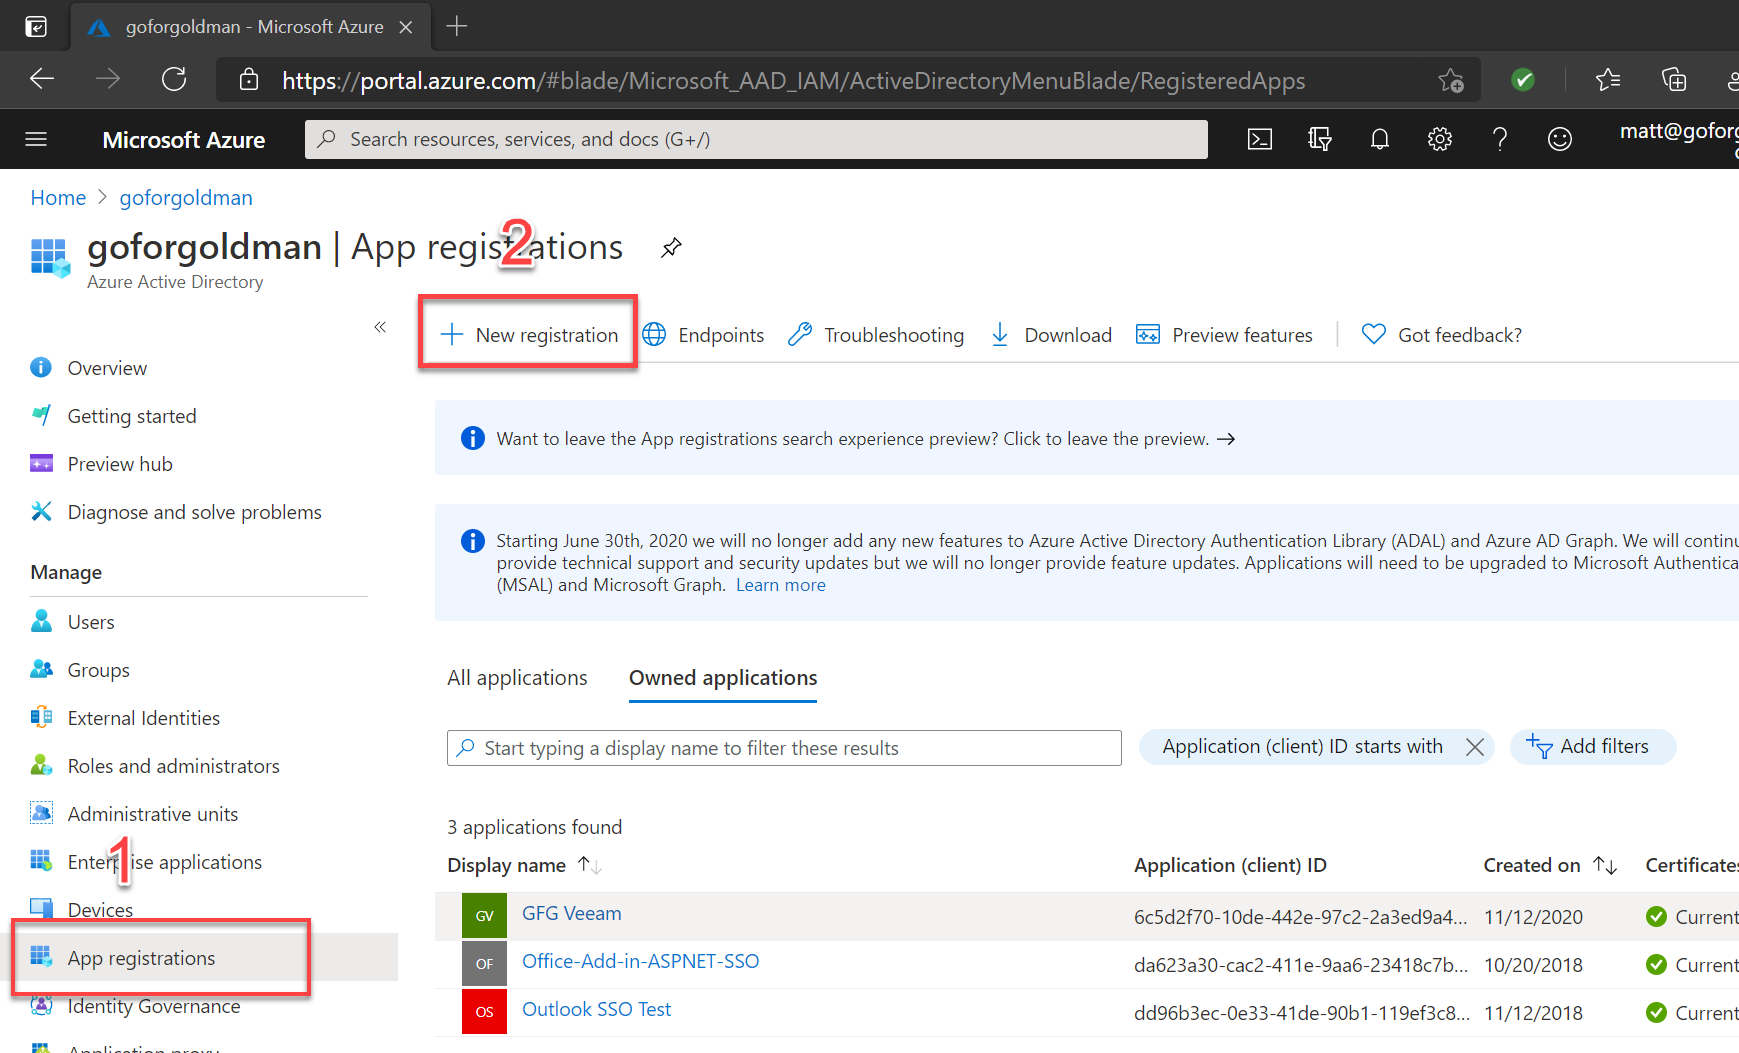
- Go to Azure Active Directrory, and click on App Registrations from the left menu, then click New Registration.
![Image showing app registration in Auzre portal]() App registration in the Azure portal
App registration in the Azure portal - Enter an applicaiton name. A good practice is to enter the name of the application you are developing, but it’s also good to segreagate your permissions. So for example if you are registering other applications with the Microsoft Graph API for other functions (e.g. user management), it’s better to create separate registrations for these. I often use MedMan as my demo application, so in this case I would enter it as
MedMan-EmailSend. - Select
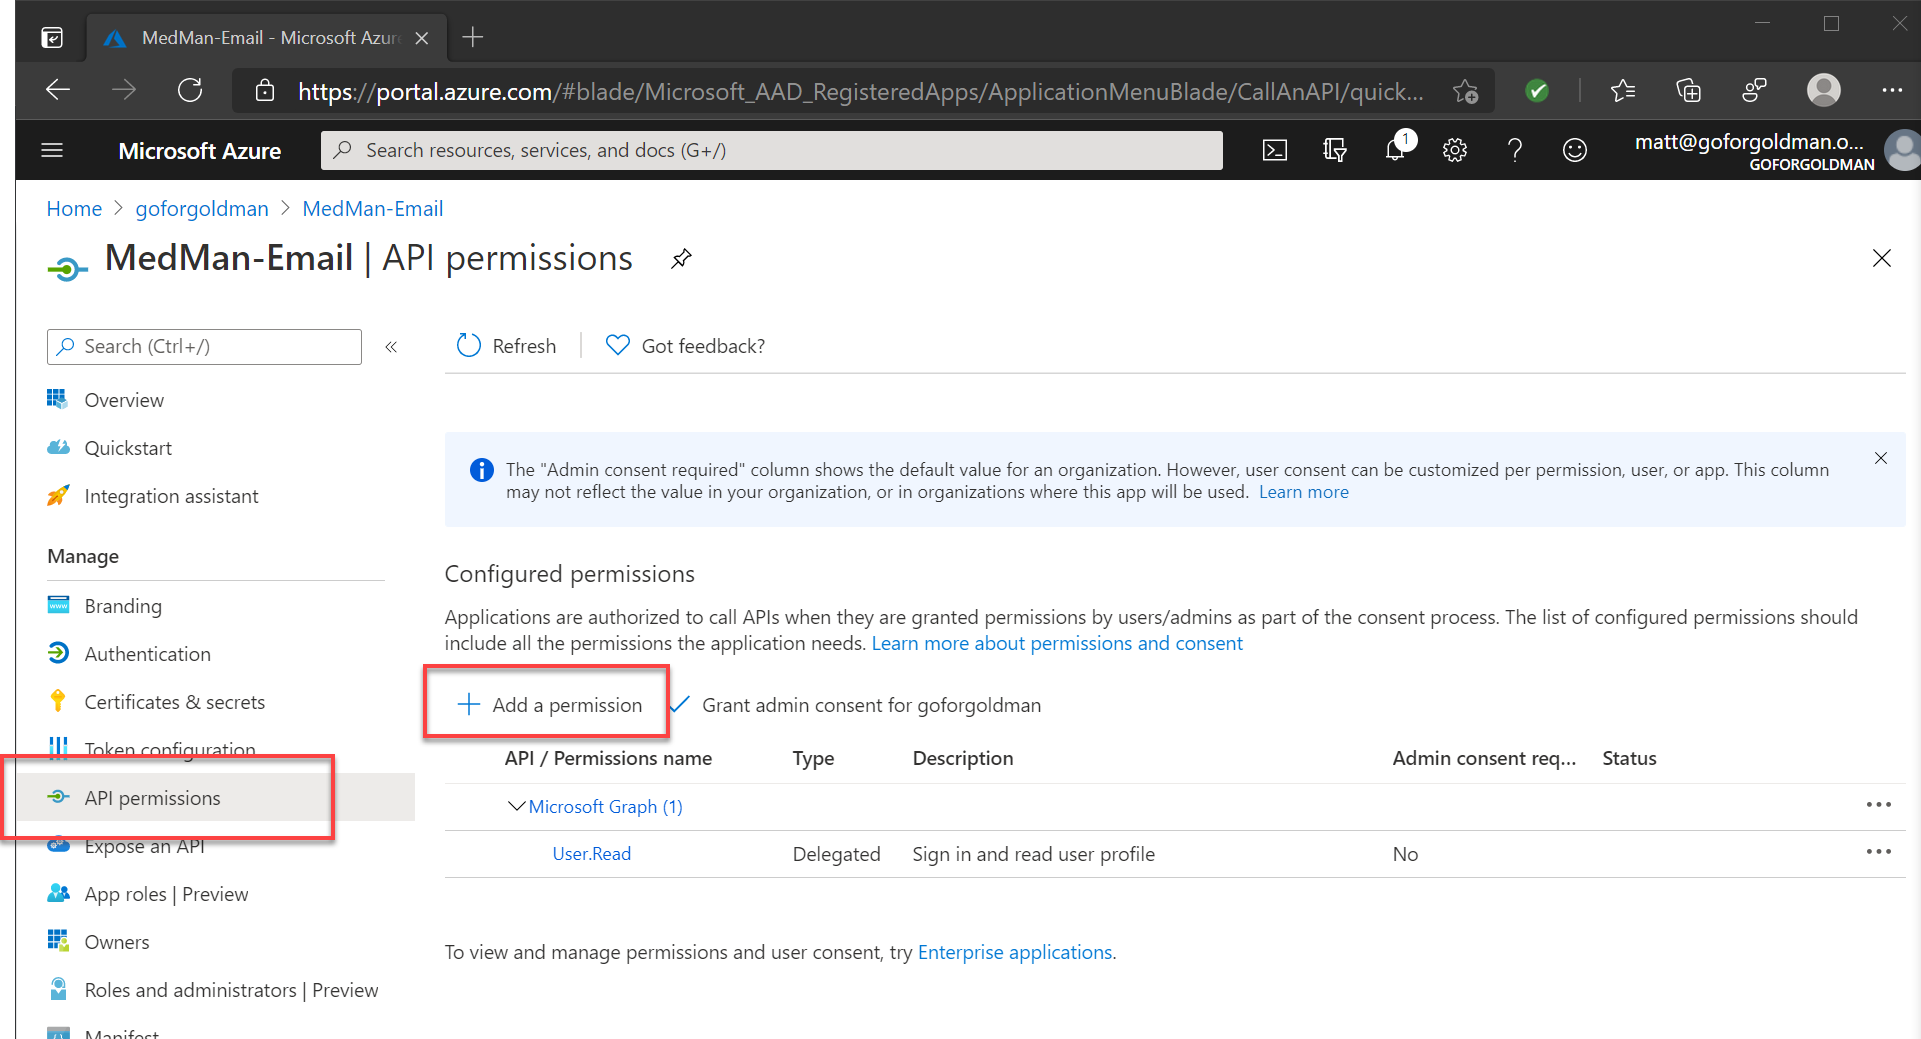
Accounts in this organizational directory onlyand then click Register. - In your new app registration, click API permissions from the left menu, then click Add a permission.
![Image showing adding permissions to app registrations]() Add permissions to an app registration
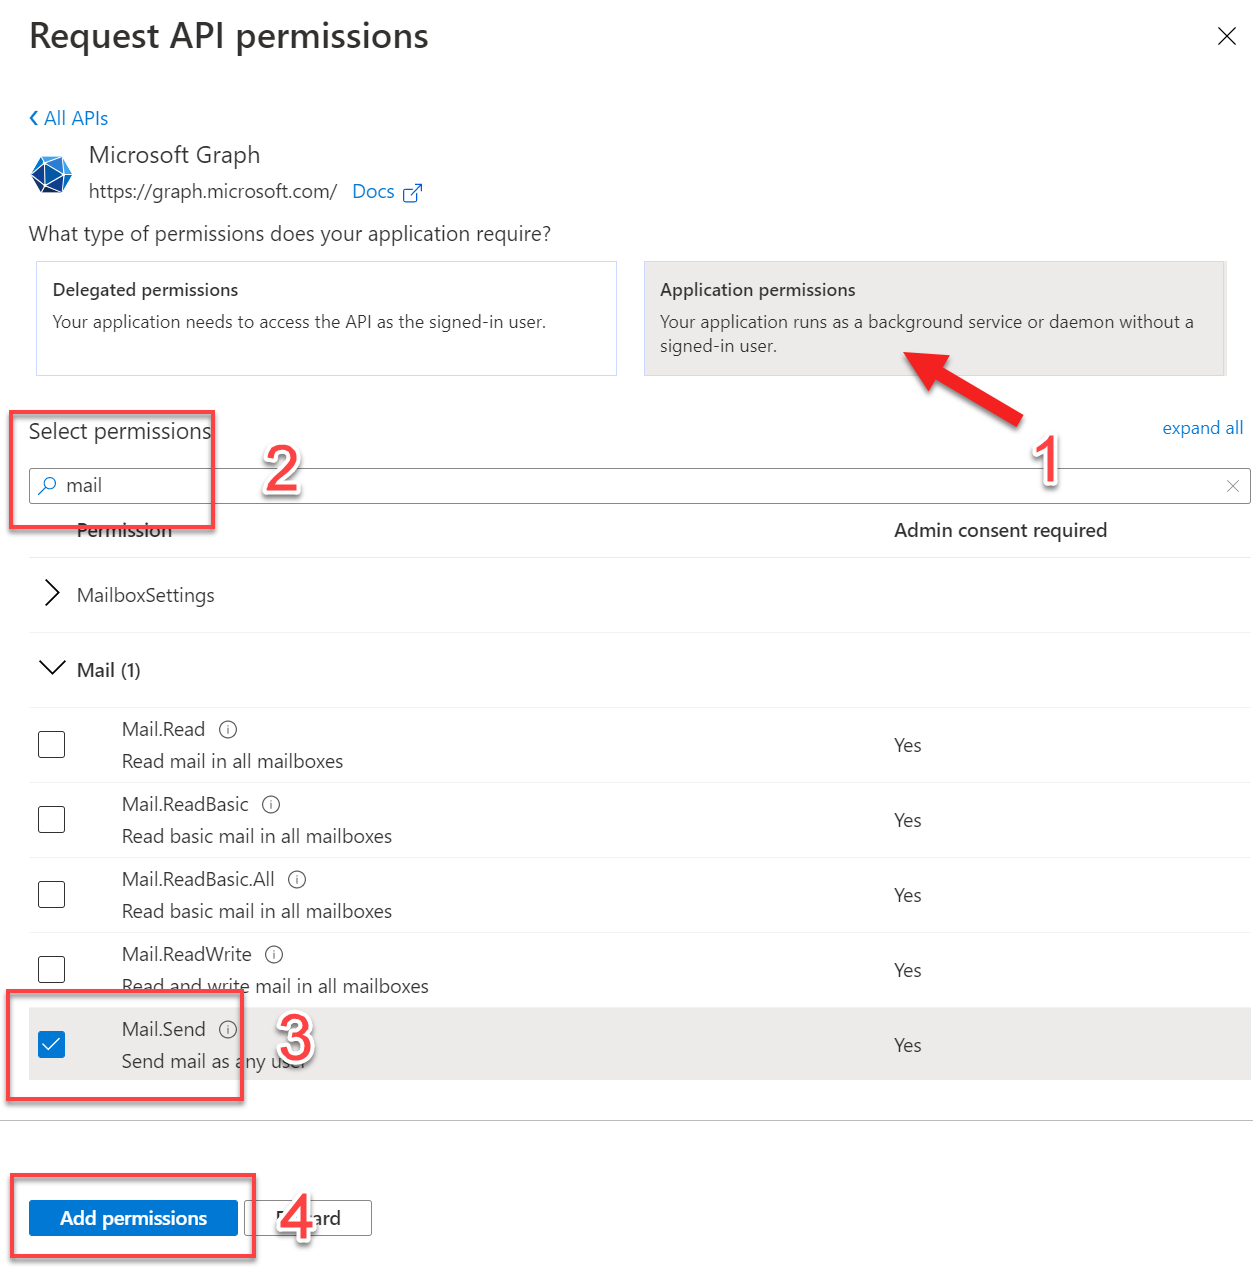
Add permissions to an app registration - In the Microsoft APIs tab, select Microsoft Graph from Commonly used Microsoft APIs. Then choose Application permissions.
- Select the
Mail.Sendpermission (use the search box to make it easier). This is all you need to send email, but select any other permissions as needed (for more information consult the documentation here.) Then click Add permissions.![Image showing Graph API mail permissions]() Set the Microsoft Graph API mail permissions
Set the Microsoft Graph API mail permissions - Click
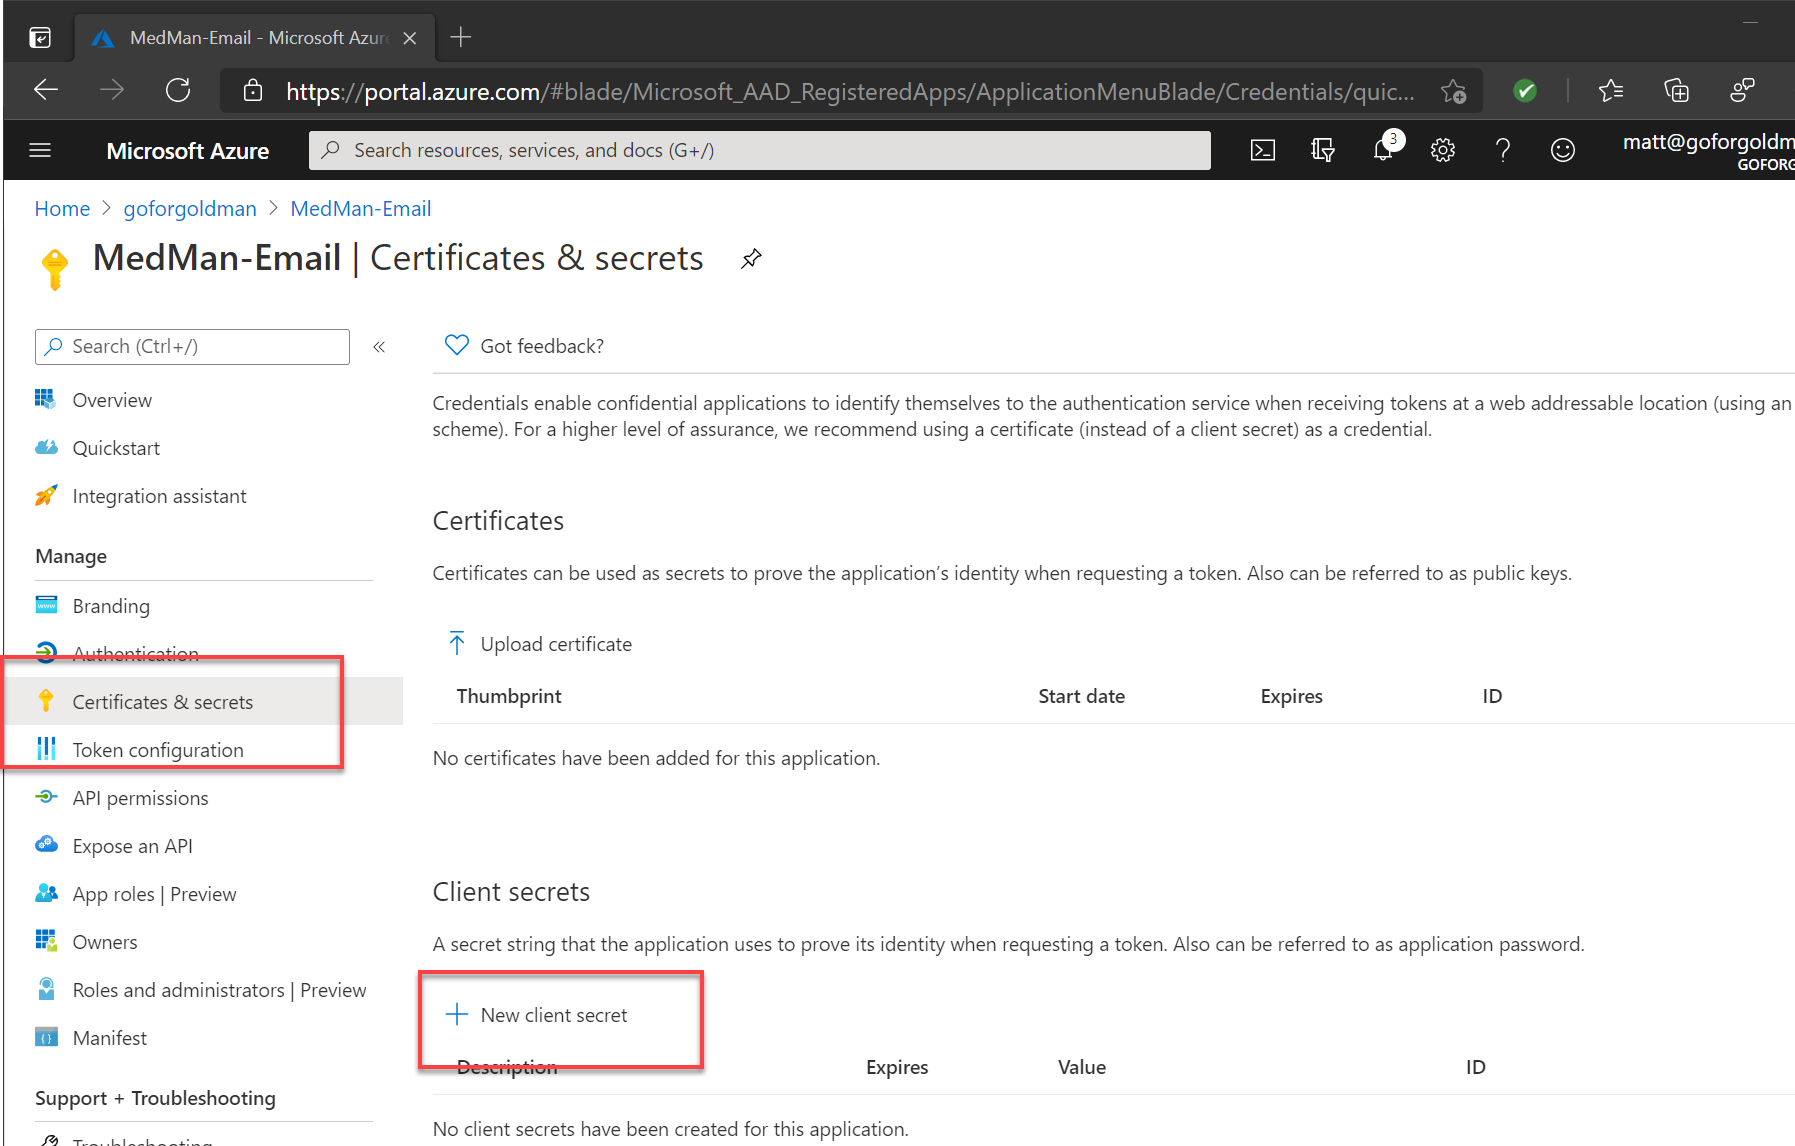
Grant admin consent for [your domain], then click yes to confirm. - Go to Certificates & secrets on the left menu, and under Client secrets, click New client secret.
![App registration client secrets in the Azure portal]() Generate an app secret for use in your application
Generate an app secret for use in your application - Add a description (something like “Used by FluentEmail in MedMan” is appropriate) and set an expiry time. One year is the default and is probably fine, but adjust as needed.
- This wil generate a new secret for you. Copy the Value and store it somewhere safe. This page will never display it again, but it’s not a big deal if you lose it, as you can just generate a new one.
That’s all the steps needed in AAD to complete your app registration for FluentEmail. Move on to the next stage to add it to your application.
2. Add FluentEmail to your application
To send email using FluentEmail and the Graph sender, you need to first add the necessary nuget packages. Add FluentEmail.Core and FluentEmail.Graph nuget packages to your project. You will also need to add FluentEmail.Razor if you want to use the Razor templating engine (and if you’re using FluentEmail then it’s safe to assume you do!).
NOTE: At time of writing, the FluentEmail.Graph package is incompatible with the latest version of FluentEmail.Core (3.0.0). Install FluentEmail.Core 2.8.0 (and associated versions of other packages as required) to ensure that this setup works for you.
With those added, you need to set up FluentEmail and the Graph sender in your startup or DI container. In my example this is in Startup.cs. First create your graph sender options:
1
2
3
4
5
6
7
var graphSenderOptions = new GraphSenderOptions
{
    ClientId = "3724c544-7da0-4115-9f9b-2c43a2b806cf",
    Secret = "qBi:FzxcyC57Cz8JGLwMt&",
    TenantId = "c332bd38-f4c6-44a9-9654-9838abec437e",
    SaveSentItems = true
};
In this example I’ve hard coded these values (don’t worry, these are not real values!). But you can also use configuration binding, or pull them in from Key Vault. The client ID and tenant ID can be found on the Overview tab of your app registration, and the secret is the one generated in step 11 above.
The SaveSentItems variable lets you decide whether items sent using this sender should be saved in the sent items folder of the mailbox you’re sending from. You can set this to true or false. Once you’ve set up your options you need to register the FluentEmail services:
1
2
3
services.AddFluentEmail("mail@goforgoldman.com", "GoForGoldman Mail Service")
        .AddRazorRenderer()
        .AddGraphSender(graphSenderOptions);
In this example, I’ve specified the default sender email address and friendly name, and passed in the Graph sender options. With that done, all that’s left is to send an email:
1
2
3
4
5
6
var email = await Email
    .From("john@email.com") // You can use .DefaultSender to use the sender specified in service registration, or override it here
    .To("bob@email.com", "bob")
    .Subject("hows it going bob")
    .Body("yo bob, long time no see!")
    .SendAsync();
Example from the FluentEmail repo
That’s all there is to it. FluentEmail is simple but also quite flexible and powerful, so there’s quite a bit more you can do with it. Check out the repo, or Luke Lowrey’s (original FluentEmail author) blog post for more details on all the cool stuff you can do with it.


